
User Login icon by IconShock
After a while I finally found a slot of time for writing this. Sorry for the long wait, and let’s get started!
This is the third part of my series of posts on how to use Azure B2C for authenticating a customer within Sitecore. You definitely want to have a look at part 1, in which I give the intro to the scenario we’re tackling here, and also part 2, in which we configure Azure B2C with the settings we will need here.
As usual, the simplicity disclaimer: This is NOT the final code – I have really simplified the approach in order to keep this short while providing you with the core of the solution. So, this code works, but you WILL need to put more work into it to make it a) suit your specific needs, and b) make it production-ready.
That said, let’s get on with it.
What we will need
Let’s have another look at the flow I have very skillfully put together for part 2:
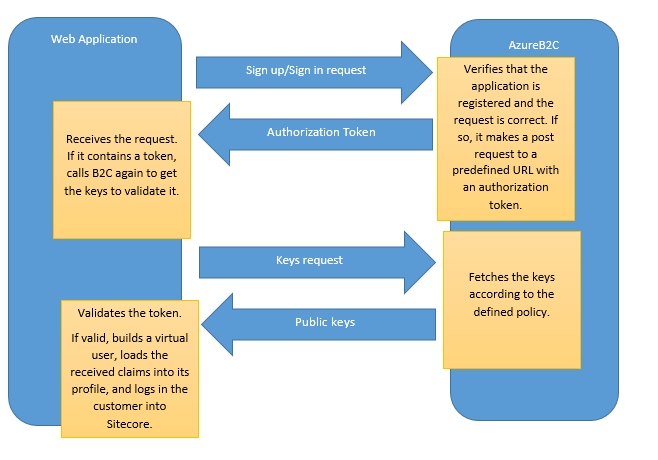
From this we can outline that we will need:
- Make a sign in/up request.
- Call B2C to get the keys we will need to validate the received token.
- Actually validate the token
- Create a virtual user and add the token claims to its profile.
- Log the user into Sitecore
- We are also adding signout functionality just for the sake of it.
As I said in my previous post, it makes sense to make the call to B2C to get the metadata before we actually need to.
Getting the keys
In this implementation, we are going to call the B2C Metadata endpoint to get data about our policy. For that, we will build a request and serialize the response into a custom B2CMetadata object. This object will contain the urls for both the Keys endpoint (jwks_uri) and the SignOut endpoint (end_session_endpoint). Later, we will use another custom object to actually store the keys, so I’m throwing that class in here too.
The custom class looks something like this:
namespace AwesomeCompany
{
[Serializable]
public class B2CMetadata
{
public string issuer { get; set; }
public string authorization_endpoint { get; set; }
public string token_endpoint { get; set; }
public string end_session_endpoint { get; set; }
public string jwks_uri { get; set; }
public List<string> response_modes_supported { get; set; }
public List<string> response_types_supported { get; set; }
public List<string> scopes_supported { get; set; }
public List<string> subject_types_supported { get; set; }
public List<string> id_token_signing_alg_values_supported { get; set; }
public List<string> token_endpoint_auth_methods_supported { get; set; }
public List<string> claims_supported { get; set; }
public B2CMetadata()
{
//Playing nice with the Serializer here
}
}[Serializable]
public class KeysWrapper
{
public List<Dictionary<string,string>> keys { get; set; }
public KeysWrapper()
{
//Again, empty constructor to please the serializer
}public Dictionary<string,string> FindByKidValue(string kid)
{
return keys.Where(k => k.Keys.Contains(“kid”) && k[“kid”].Equals(kid)).FirstOrDefault();
}
}
}
Great, so we have our class ready, let’s call the endpoint. We will do so in a helper class that we will call B2CHelper. For the sake of simplicity, we are just storing the object in the session (I know it makes no sense, but this is just an example).
namespace AwesomeCompany
{
public static class B2CHelper
{public static void InitializeMetadata()
{
string metadataEndpoint = String.Format(“https://login.microsoftonline.com/{0}/v2.0/.well-known/openid-configuration?p={1}”, <your_tenant>, <your_policy>);HttpWebRequest request = (HttpWebRequest)WebRequest.Create(metadataEndpoint);
request.Method = “GET”;
string respJson = String.Empty;
using (var response = request.GetResponse())
{
using (var sr = new StreamReader(response.GetResponseStream()))
{
respJson = sr.ReadToEnd();
}
}
var serializer = new JavaScriptSerializer();
B2CMetadata config = serializer.Deserialize<B2CMetadata>(respJson);HttpContext.Current.Session[“_B2CMETADATA_”]=config;
}
public static KeysWrapper GetB2CKeys()
{
var config=(B2CMetadata)HttpContext.Current.Session[“_B2CMETADATA_”];HttpWebRequest keysRequest = (HttpWebRequest)WebRequest.Create(config.jwks_uri);
request.Method = “GET”;
string keysJson = String.Empty;
using (var kresponse = keysRequest.GetResponse())
{
using (var ksr = new StreamReader(kresponse.GetResponseStream()))
{
keysJson = ksr.ReadToEnd();
}
}
var keySerializer = new JavaScriptSerializer();
KeysWrapper keys = serializer.Deserialize<KeysWrapper>(keysJson);return keys;
}
}
}
Pretty similar methods that should absolutely be refactored into something more beautiful, but I did say this was not meant for production, so don’t complain 😛
Well, now we have our classes ready. Again, we should call B2CHelper.InitializeMetadata() at some point when the application starts, probably in the initialize pipeline, and store the result somewhere. I do it in the Session object just for simplicity, but CLEARLY that’s not a good choice. It’s up to you to use the storage provider that suits you best.
Let’s jump to another thing we need.
Creating SignIn/Up and SignOut
We will of course need the ability to trigger Signing in/up/out within our application. For this, we will use two methods in a controller that, oh the beauty of lazy thinking, we will call B2CAuthorizationController.
namespace AwesomeCompany
{
public class B2CAuthorizationController : Controller
{
[System.Web.Mvc.HttpGet]
[AllowAnonymous]
public void SignInUp()
{
string returnUrl = Request.UrlReferrer.AbsolutePath;
if (!Sitecore.Context.User.IsAuthenticated)
{
B2CHelper.InitiateCustomerSignInUp(returnUrl);
}
}public void SignOut()
{
B2CHelper.LogOut();
WebUtil.Redirect(Request.UrlReferrer.AbsolutePath);
}
}
}
And of course we need to implement the InitiateCustomerSignInUp and LogOut methods in the B2CHelper we defined above:
public static void InitiateCustomerSignInUp(string returnUrl = “/”)
{
var config=(B2CMetadata)HttpContext.Current.Session[“_B2CMETADATA_”];string authEndpoint = config.authorization_endpoint;
//We are using the Nonce parameter to avoid replay attacks
string nonce = Guid.NewGuid().ToString();
HttpContext.Current.Session[“_NONCE_”]=nonce;//We use the State attribute to send the Url where we should redirect to when done with the auth stuff
string state = returnUrl;string rType = “code+id_token”;
string rMode = “form_post”;
string clientId = <your_application_id>;
string redirUri = <your_redirect_url>;
string scope = “openid%20offline_access”;
string policy = <your_policy>;
string url = String.Format(“{0}?response_type={1}&response_mode={2}&client_id={3}&redirect_uri={4}&scope={5}&state={6}&nonce={7}&p={8}”,
authEndpoint, rType, rMode, clientId, redirUri, scope, HttpUtility.UrlEncode(state), HttpUtility.UrlEncode(nonce), policy);//Redirects to the B2C auth endpoint with our parameters
WebUtil.Redirect(url);
}public static void LogOut()
{
//Just logout
Sitecore.Security.Authentication.AuthenticationManager.Logout();}
Nothing weird here, just building a Url, redirecting to it and that’s it.
Note that we are handling both SignUp and SignIn with a single method – that’s why we have set up a single signin-signup policy in part 2.
You can refer to that post to know where to find the <your_application_id>, <your_redirect_url> and <your_policy> parameters. Also, note that we are Url encoding the nonce and state parameters.
Let’s now deal with the response we get from B2C.
Analyzing B2C response
When B2C processes our authorization request, it POSTs the response data in a new request to our defined RedirectUri. In part 2 we did very creatively defined that uri: https://localhost/ProcessB2CResult (NOTE: There’s a typo in part 2 that defines http as the protocol within the return Uri config in B2C. It should be https).
From the Sitecore side, this is just another request, so we need to tap into the HttpRequestBegin pipeline. Our patch file will look something like this:
<sitecore>
<pipelines>
<httpRequestBegin>
<processor type=”AwesomeCompany.Pipelines.Processors.B2CUserResolver,AwesomeCompany”
patch:after=”processor[@type=’Sitecore.Pipelines.HttpRequest.UserResolver, Sitecore.Kernel’]” />
</httpRequestBegin>
</pipelines>
</sitecore>
And our actual processor will look like this:
public class B2CUserResolver : HttpRequestProcessor
{
public override void Process(HttpRequestArgs args)
{
if (Sitecore.Context.User.IsAuthenticated) { return; }
var loginResultUrl = <your_redirect_url>; //https://localhost/ProcessB2CResult
if (loginResultUrl.ToLower().EndsWith(args.Url.FilePathWithQueryString.ToLower()))
{
//We need to get the token and other post data that B2C sent us
var idToken = HttpContext.Current.Request.Form[“id_token”];
var idstate = HttpContext.Current.Request.Form[“state”];if (string.IsNullOrEmpty(idToken)) { return; }
//Validate the token
var validToken = B2CHelper.ValidateToken(idToken);
if (validToken == null)
{
if (!String.IsNullOrWhiteSpace(idstate))
{
Sitecore.Web.WebUtil.Redirect(idstate, false);
args.AbortPipeline();
}
else {
return;
}
}
else
{
//All seems valid, but let’s check the Nonce
if(HttpUtility.UrlEncode((string)HttpContext.Current.Session[“_NONCE_”])!=validToken.Nonce)
{
//Nonce is not matching the value previously sent, so the token is not our token after all.
return;
}}
Dictionary<string, string> tokenClaims = new Dictionary<string, string>();
foreach (var c in validToken.Claims)
{
tokenClaims.Add(c.Type, c.Value);
}
bool loggedin = this.CreateAndLoginUser(tokenClaims[“given_name”], tokenClaims[“given_name”] + ” ” + tokenClaims[“family_name”], tokenClaims);
if (loggedin)
{
if (!String.IsNullOrWhiteSpace(idstate))
{
Sitecore.Web.WebUtil.Redirect(idstate, false);
args.AbortPipeline();
}
}
}
}private bool CreateAndLoginUser(string userName, string fullName, Dictionary<string, string> props)
{
bool _res = false;
Sitecore.Security.Accounts.User currentUser;
bool success = B2CHelper.CreateVirtualUser(userName, fullName, props, out currentUser);
if (success)
{
bool loggedin = Sitecore.Security.Authentication.AuthenticationManager.LoginVirtualUser(currentUser);
_res = loggedin;
}
return _res;
}
}
For this example, I am using the given_name and family_name claims to build the Sitecore virtual user, but of course you can use other claims from the ones you configured in B2C.
With this processor in place, things look pretty complete, except for the B2CHelper.CreateVirtualUser method, and the most important part, the B2CHelper.ValidateToken method.
So, let’s add those methods to out B2CHelper class.
Building the Sitecore user
The CreateVirtualUser method is pretty simple and is in charge of creating a virtual user object, assigning a role to it (which you should already have created in Sitecore), and adding a set of properties to its profile.
public static bool CreateVirtualUser(string userName, string displayName, Dictionary<string, string> properties, out Sitecore.Security.Accounts.User user)
{
bool _res = false;
user = null;
try
{
string fullUsername = String.Format(“extranet\\{0}”, userName);
// Create virtual user
var virtualUser = Sitecore.Security.Authentication.AuthenticationManager.BuildVirtualUser(fullUsername, true);
virtualUser.RuntimeSettings.Load();
virtualUser.RuntimeSettings.AddedRoles.Clear();
virtualUser.Roles.RemoveAll();
virtualUser.RuntimeSettings.AddedRoles.Add(“extranet\\AwesomeCompanyCustomer”);//set profile properties
virtualUser.Profile.Email = userName;
virtualUser.Profile.Name = displayName;
foreach (var prop in properties)
{
virtualUser.Profile.SetCustomProperty(prop.Key, prop.Value);
}
virtualUser.Profile.Save();
virtualUser.RuntimeSettings.IsVirtual = true;virtualUser.RuntimeSettings.Save();
user = virtualUser;
_res = true;
}
catch (Exception ex)
{
_res = false;
}
return _res;
}
The other method is a bit shorter but it does a very important thing – it validates the token. This can of course be done from scratch, but we already have a robust and proven way to take care of this essential task.
Validating the JWT token
The core of the token validation logic is done by the System.IdentityModel.Tokens.Jwt assembly, part of the System.IdentityModel framework by MS.
We are also building a crypto provider with the public keys we get from B2C, so we will need the System.Security.Cryptography namespace too.
public static JwtPayload ValidateToken(string rawToken)
{
JwtPayload token;
if (Validate(rawToken, out token))
{
return token;
}
else
{
return null;
}
}
private static bool Validate(string rawToken, out JwtPayload token)
{
try {
var handler = new JwtSecurityTokenHandler();
if (!handler.CanReadToken(rawToken) || !handler.CanValidateToken)
{
token = null;
return false;
}
var tkn = handler.ReadToken(rawToken) as JwtSecurityToken;
JwtHeader header = tkn.Header;
JwtPayload jwtPayload = tkn.Payload;
//Get the keys for validation
var keysDictionary = B2CHelper.GetB2CKeys();
var key = keysDictionary.FindByKidValue(tkn.Header[“kid”].ToString());
var publicKey = new { e = key[“e”], n = key[“n”] };
var signatureToValidate = tkn.EncodedHeader + “.” + tkn.EncodedPayload;//Create a CryptoServiceProvider to represent the public key
RSACryptoServiceProvider rsa = new RSACryptoServiceProvider();
rsa.ImportParameters(
new RSAParameters()
{
Modulus = StringUtil.Base64UrlDecode(publicKey.n),
Exponent = StringUtil.Base64UrlDecode(publicKey.e)
});
var rawSignature = tkn.RawSignature;//Add the provider to the tokenvalidation parameters
var options = new TokenValidationParameters()
{
IssuerSigningKeyResolver =
((tk, st, kid, tvp) => { return new RsaSecurityKey(rsa); }),
ValidIssuer = tkn.Issuer,
ValidAudiences = tkn.Audiences,
ValidateLifetime = true,
ValidateIssuer = true,
CertificateValidator = X509CertificateValidator.None
};
SecurityToken secToken;//Call the validator with our keys
handler.ValidateToken(rawToken, options, out secToken);
token = jwtPayload;
return true;
}
catch (SecurityTokenValidationException vex)
{
//Validation exceptions are caught here
token = null;
return false;
}
catch (Exception ex)
{
token = null;
return false;
}
}
And that’s it! With that last piece of code, we have a working solution that takes care of the scenario we outlined in part 1.
Next steps
As I said, this is just a naked example of how to authenticate customers in Sitecore using B2C. You WILL need to change things in this code to adapt it to your specific needs. You will also need to make it better, because (let’s face it) this code is ugly.
Some things I suggest you add or change are:
- In the processor, you should write code to ignore all the custom logic when running in a site other than the public one (this code should not run for the shell site, the modules_shell site, and so on).
- You should follow the single responsibility principle for designing your classes, which I clearly didn’t follow here (and it almost makes me cry).
- You should fix any syntax errors you find (I’m writing this in notepad, so give me a break!).
- You should call the Metadata service at some point at the start of the application, in the initialize pipeline probably.
- You should make it beautiful (please!)
Well, this brings this post, and the series, to an end. I hope you can find some of these concepts and ideas useful. Also, please let me know how this worked out for you, what problems you face with this example implementation, and if I missed something here.
Azure B2C promises to bring cool things to the game (I am looking forward to seeing it come out of preview), and Sitecore is an extensible and flexible platform that is especially suited to try out new things in an effortless way.
See you in my next (hopefully not-so-long) post!

Hi,
First of all, I would like to thank you for putting together such a great article.
I am following the steps described in this article for my prove of concept. I encoutered some problem intializing the metadata . We didn’t use the Client Secret anywhere here. How does the application establish the connection to B2C initially? I don’t see that in the InitializeMetadata method. Also in the example, it seems to me that you are using the Login policy to get your keys. Shouldn’t we use the token_endpoint to get the keys? Maybe I am confused. Any help would be greatly appreciated. (Although I am already appreciating your great effort putting this together! :))
Thanks and keep up the good work!
– Angel.
LikeLike
Hi Angel;
Thank you for stopping by, it’s great that you find the article useful.
Some notes on your comments:
1- The Client Secret is not used – You use a client secret in order to use application-level authorization (allowing your application to use an external resource) and not for user level authentication (allowing your user to log-in to B2C). For instance, you would need to use a client secret if you want to call Graph Api.
In part 2, I mentioned that this page has some info on the requests we are using to verify users: https://azure.microsoft.com/en-us/documentation/articles/active-directory-b2c-reference-oidc/ . The tenant and the client id are enough to connect to B2C. Keep in mind that B2C is a product built on top of AzureAD designed to make it easy to do certain things if you only need customers (not full-blown users), therefore some things get simplified. Also, notice that these are simple GET requests that don’t require adding authorization headers.
Compare that to this page: https://azure.microsoft.com/en-us/documentation/articles/active-directory-b2c-devquickstarts-graph-dotnet/ , which details how to authorize an application (client) to use an external resource (Graph api, for instance). Note how this approach, while more powerful, is also more complex, involving powershell, client secret, and whatnot for the setup, and an authorized POST request for each operation. This is actually an AzureAD feature, and gives access to the full AD set of operations.
2- We are contacting the discovery/{version}/keys endpoint to get the keys, and we need to pass the policy. The keys available for one policy may not be the same ones that you need for a different policy.
An additional note: If you are not using sitecore, you may want to use any of the available libraries mentioned in the B2C examples page, like ADAL or the OWIN middleware. I am an old-fashioned, raw request kind of guy 🙂
Have a great day!
Pablo.
LikeLike
Thanks Pablo! That works like a charm! I also tried using OWIN in Sitecore to do my authentication and it works as well. This is a great exercise to understand B2C and Sitecore. Thanks!
– Angel.
LikeLike
Hi Angel –
Can you please tell me how id you make it work with OWIN? Did you use Azure AD B2C?
LikeLike
Great to know, Angel!!
I agree that this is a good thing to understand B2C, especially since it’s still in preview and there are not many reference sources out there. That was the idea behind the posts – to contribute a bit more to knowing about the B2C-Sitecore integration possibilities 🙂
Habe a great day!
LikeLike
Hi again, Pablo,
Oh, I forgot to mention:
1) We definitely cannot store NONCE in Session, as you mentioned before, because Session is not available in the User Resolver yet.
2) After Sitecore redirection, Sitecore.Context.User.IsAuthenticated always returns false. I am still trying to figure this out.
But that’s a good start.
LikeLike
Hi Angel;
I agree, with #1 – that’s why I always emphasize that thiscode is not to be used as-is, it’s not copypaste material. I’ve seen my share of copypaste experts and just don’t want to contribute to the trend. I think of my posts as correct examples, rather than correct implementations 🙂
As for #2, that’s an issue I also encountered, and it is weird. I also found that if instead of building a virtual user you create a real one, then it doesn’t lose the authenticated property. Weird, huh.
Have a great day!
LikeLike
Hi Pablo –
very Helpful article, i am able to set the user with a small tweak and it looks like it is working fine.
Initially user was not getting set so i had to add below line of code in CreateAndLoginUser methods.
Sitecore.Security.Authentication.AuthenticationManager.SetActiveUser(currentUser);
This all works fine for first request What about subsequent request. Don’t we need to drop any cookie or something so that all subsequent requests could be authenticated too.
I am having main issue with state management at this time.
LikeLike